Recently, we performed a penetration test on an Android application available on the Play Store. The app had good security in place to protect it from being opened and executed on a rooted app. In this blog post, Sanjay from NotSoSecure describes how he got around every necessary check to conduct API/dynamic testing on an Android application.
This is a tale of circumventing all checks to record the activity of an Android application on a rooted smartphone. It took us 16 hours to crack and in this blog we’ll tell you the story of how we did it.
- The First 8 Hours: Root Detection Check in Native Java code
- The Next 2 Hours: Emulator Check
- The Next 1 Hour: Frida Running Check
- The Next 2 Hours: Root Detection Check in React Native "index.android.bundle" file
- The Final 3 Hours: SSL Pinning Bypass
The First 8 Hours: Root Detection Check in Native Java code
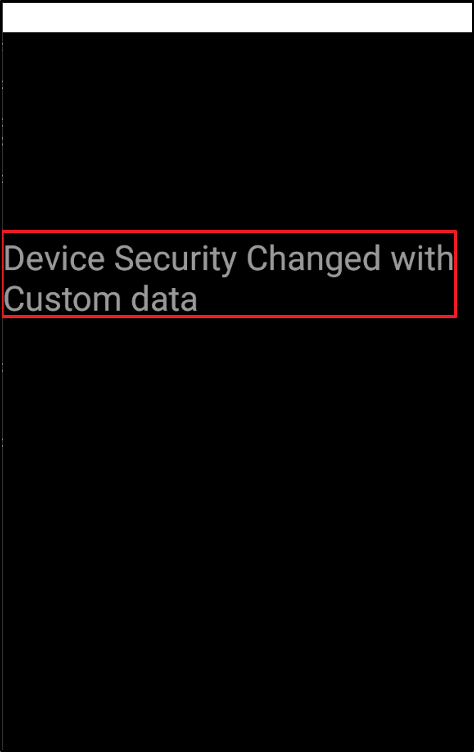
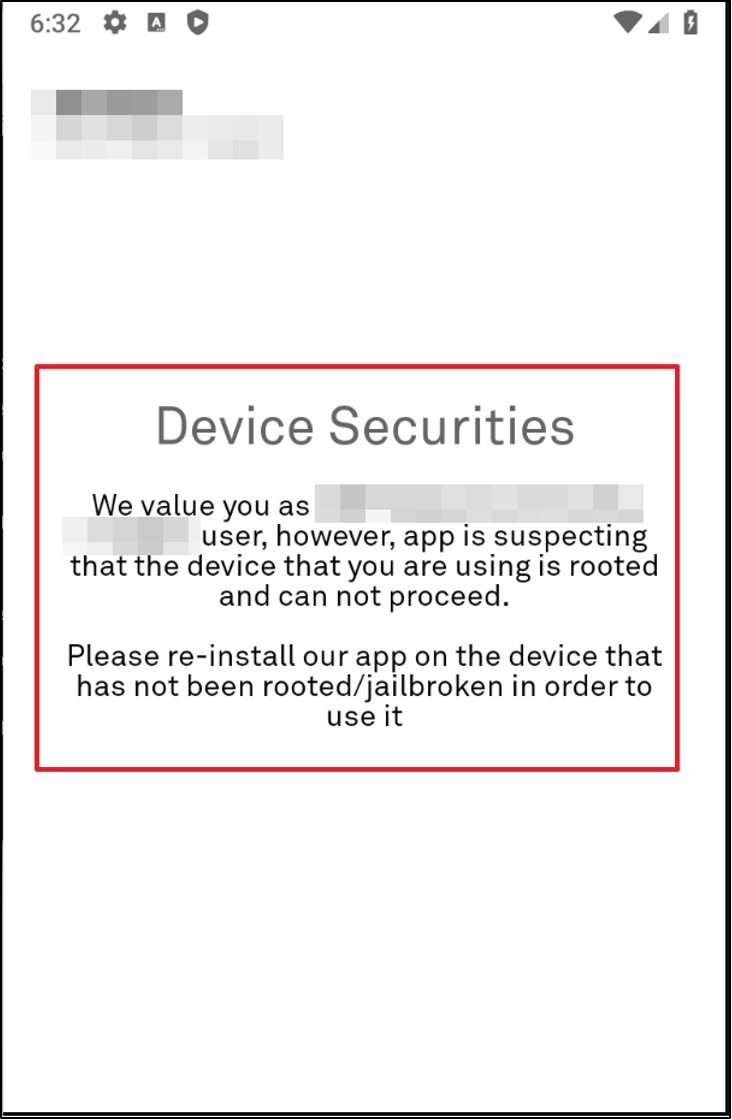
It all started with BlackScreen and a custom error message reading "Device Security" when the app was loaded on an emulator. The application was working fine on a non-rooted mobile device, however, only under the pretext that there was no proxy configured on the device. Keeping the following information in mind we proceeded to test the APK in our emulator.
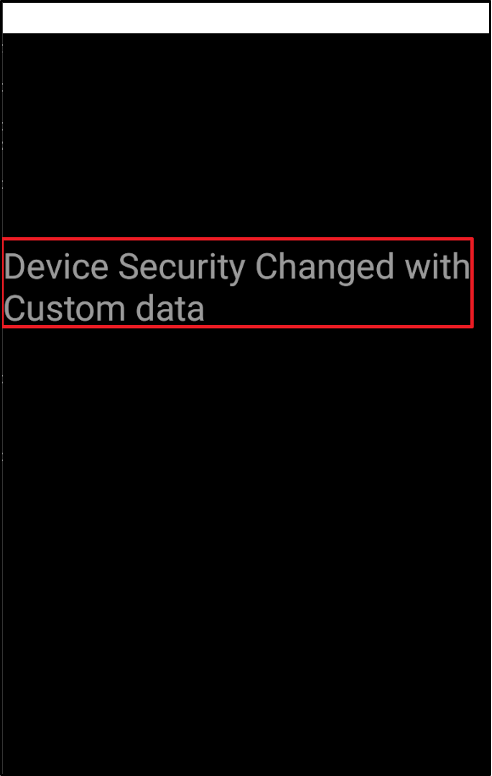
When we installed the application from the Play Store on an emulator, it showed us the following screen:

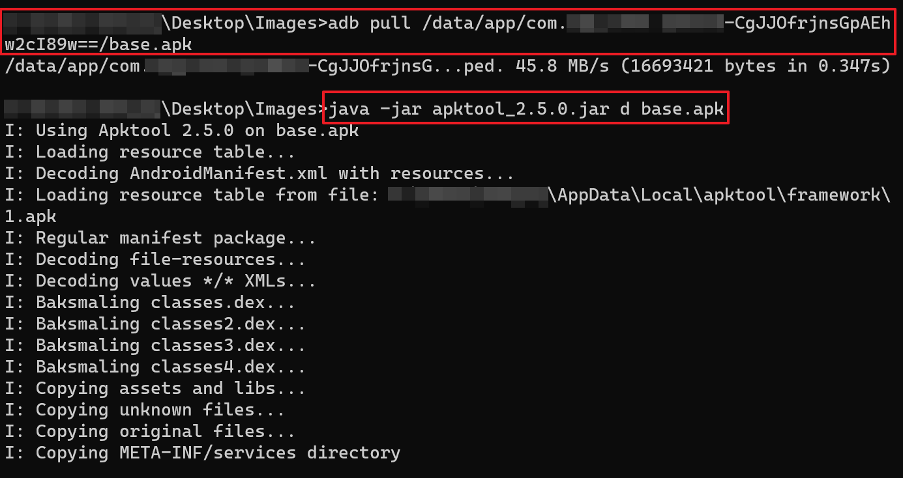
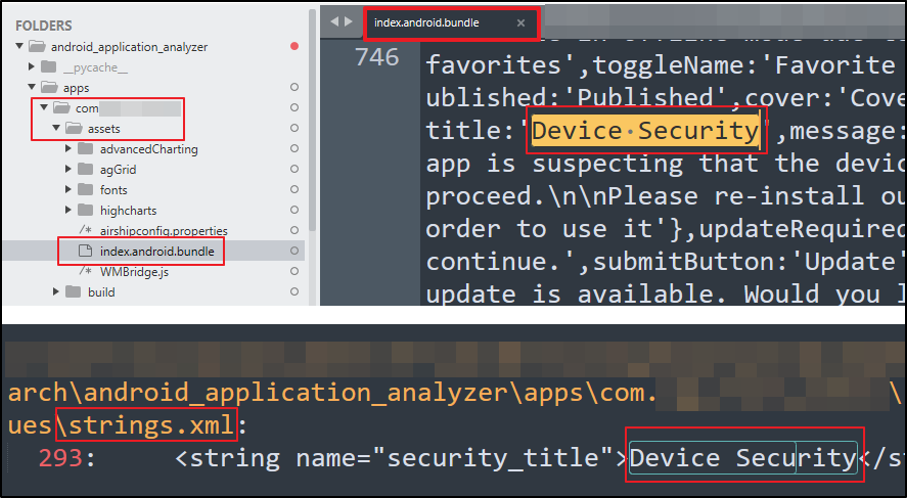
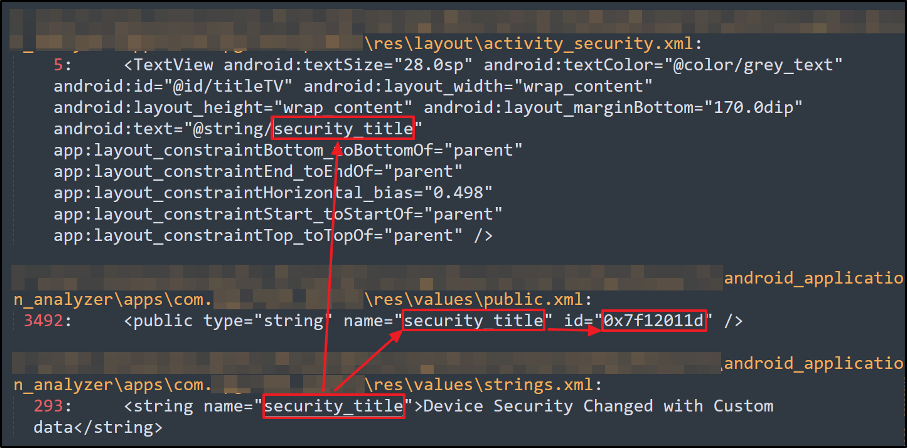
To identify the function responsible for showing this error message, we usually use the string backtracking. To do that, first we had to extract the application APK from the device and decompile it using apktool.jar.
We searched for the "Device Security" string and found 2 occurrences of it:
- "index.android.bundle" file
- "strings.xml" file
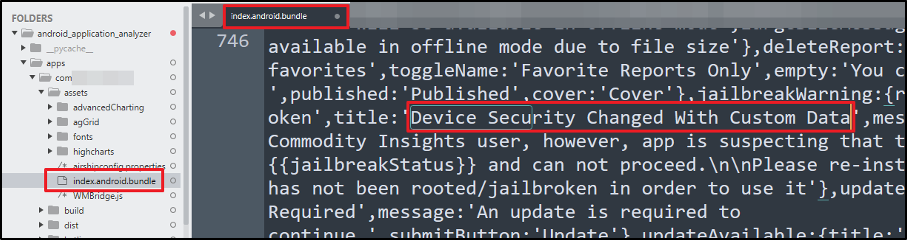
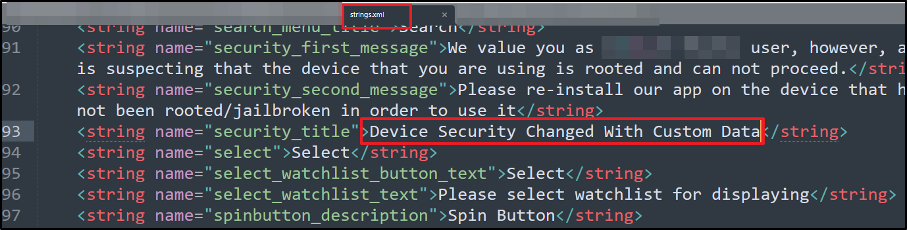
If the application is built in React Native, then the entire source code of the application is there in "index.android.bundle". To check whether the error message was picked up from that title value or not, we modified the error message from "Device Security" to "Device Security Changed with Custom Data".
To test this, we had to perform a series of commands, including:
- Rebuilding the source using apktool.jar and generate APK
- Signing the newly generated APK
- Uninstalling the application from device
- Installing the newly-signed APK to device
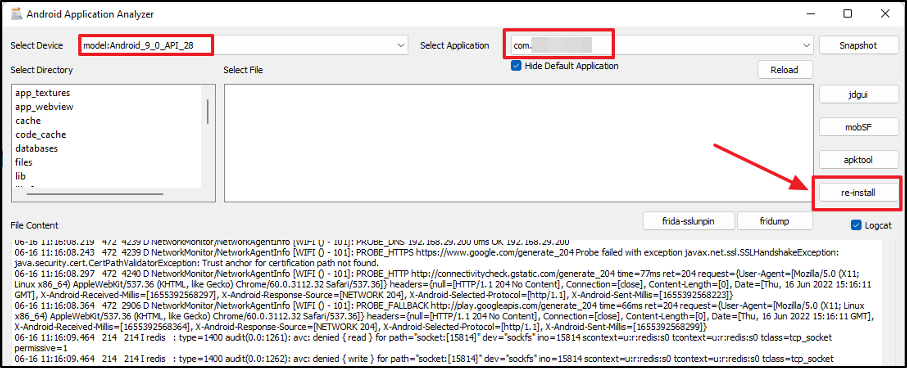
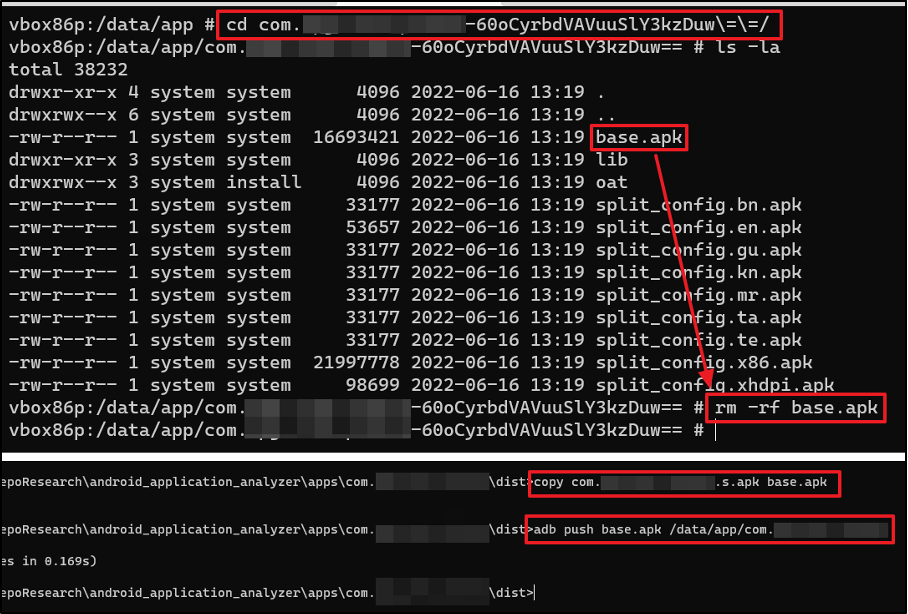
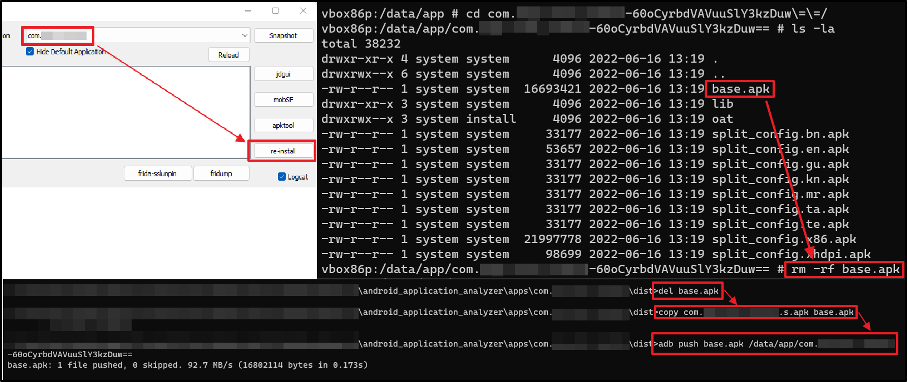
This was a very time-consuming task and we had to repeat these steps multiple times. To overcome this, we used our tool created at NotSoSecure called android_application_analyzer where we can complete all the above steps with a single click.
When we tried to install the newly created and signed APK to the emulator, it prompted an error message.

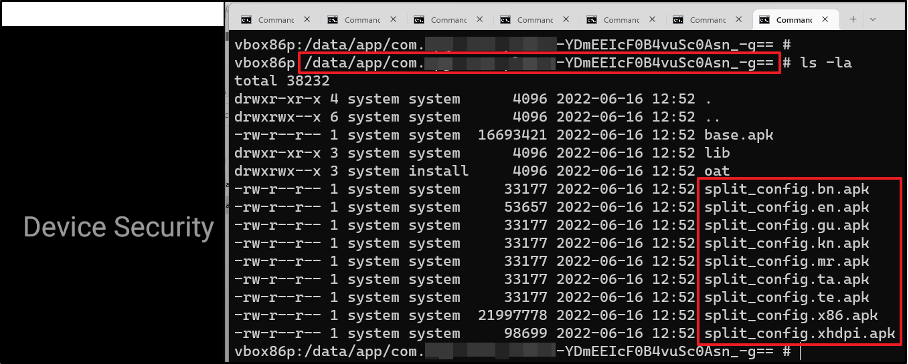
Despite lengthy analysis of the source code, we had no luck finding out what the issue was. We tried reinstalling to see how it creates the files in the emulator.
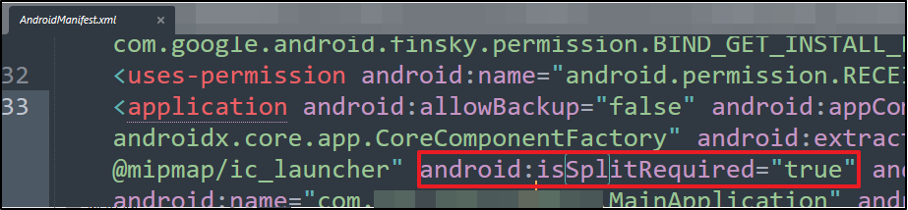
We reinstalled the application from Play Store again, analysed the content in the application folder of the device and found "split_config" related information.
We had seen similar information in the "AndroidMenifest.xml" of the app, so we removed that attribute and tried to install the application again, but it still was generating an error message.
As an alternate approach, we manually replaced the modified signed APK file using "adb push" command.
Our edited version of the application successfully loaded, but it still responded with the same error message.

Now that we were able to load the app manually, we modified the content to see if our changes would reflect on the app in the "Device Security" Title field.
We made the necessary changes and reinstalled the app.
We were now able to see the modified content on the app, but we still had to bypass the root check.
Using the backtrack process we started searching for the unique keywords “security_title” and the “id” value associated. Although we found a few instances, it was ultimately a dead end.
We knew that the application was protected against being loaded on rooted Android devices with multiple root checks. To investigate further, we searched for random keywords like "Rooted" in the application source code and found a few occurrences.

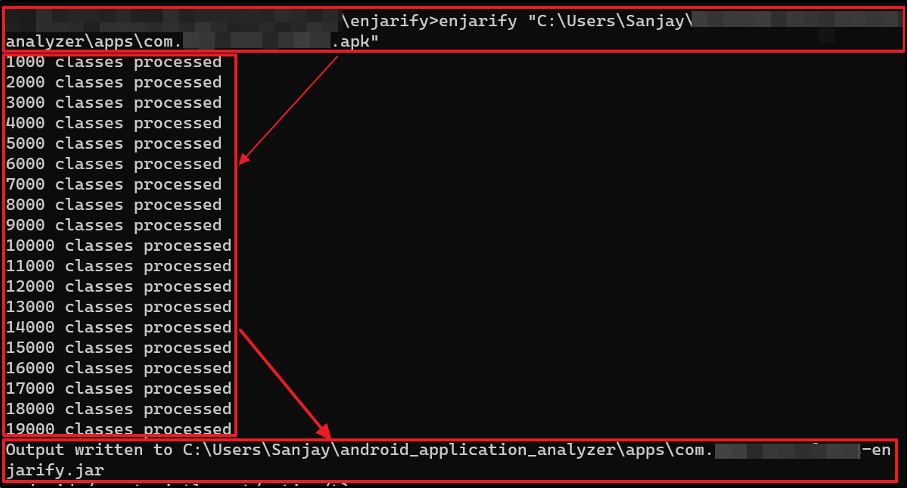
The next step was to convert the Smali code to .jar by using dex2jar and analyse the code in JD-GUI. However, during this process we got the following error:

There is another tool to covert the Smali code called Enjarify. Enjarify is a tool for translating Dalvik bytecode to equivalent Java bytecode. This allows Java analysis tools to analyse Android applications. Enjarify will always produce a .jar file, even if there are errors in translation. Error pages will not be readable, but the remaining content can be easily traversed.
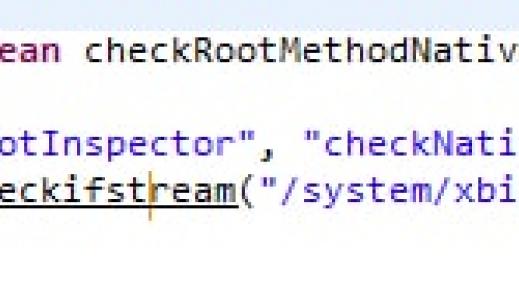
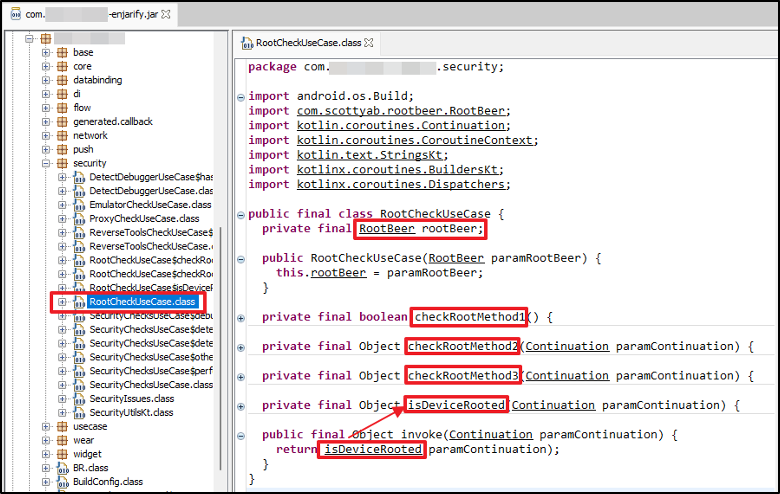
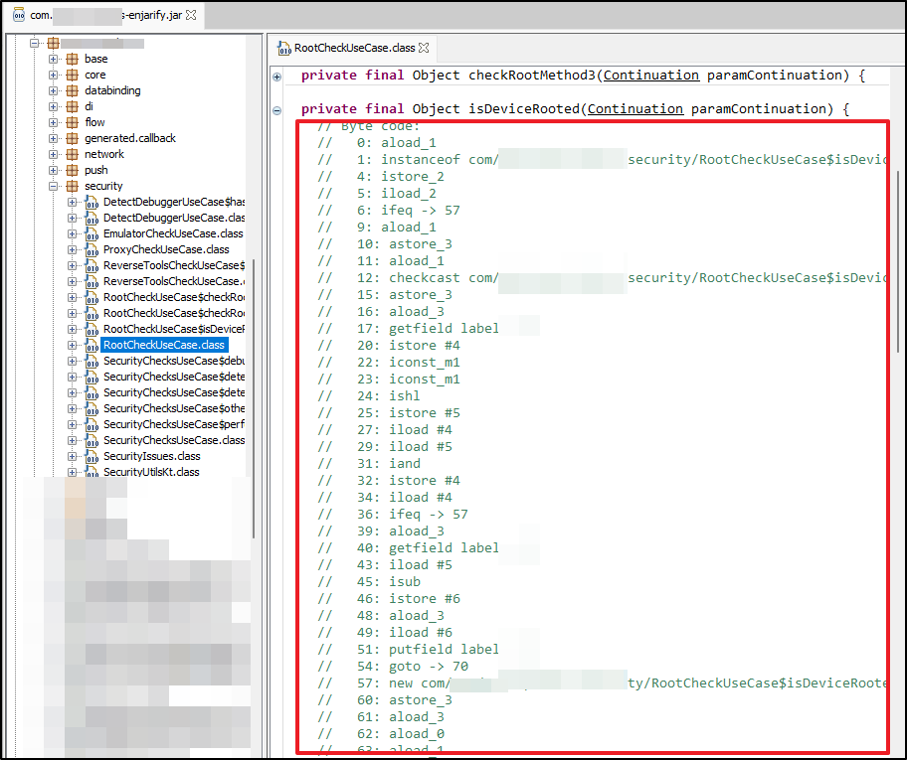
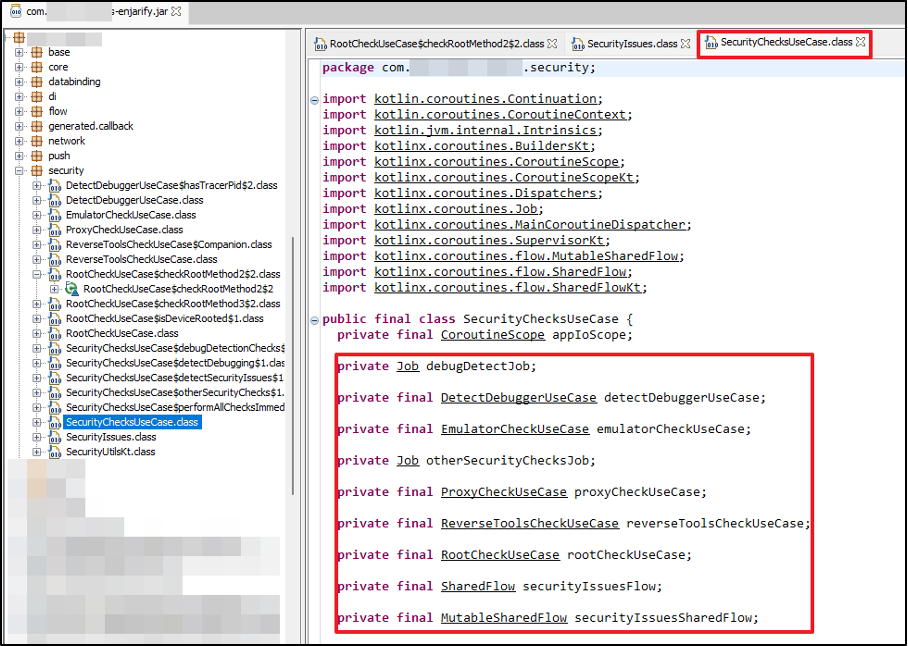
Once we got the .jar file, we analysed the source code of "RootCheckUseCase" class. We identified RootBeer and custom implementation of root detection where it called "invoke" function, which essentially called "isDeviceRooted" function and within that it called all the other functions, such as:
- checkRootMethod1
- checkRootMethod2
- checkRootMethod3
Normally, to bypass this, we can write a Frida script and overwrite the definition of the "invoke" function. But this custom implementation accepts an object of class "Continuation" and returns an object. This presented another mystery for us to solve.
We tried to analyse the source code of the "isDeviceRooted" function which seemed to be the responsible function for root detection check, but Enjarify was not able to decompile the source code of that function. That put us in a tricky situation as we were not able to identify the object of that class and its possible return value which would be returned from this function.
What does one do when coming up against regular checks? Take a step back and analyse. All the functions within "RootCheckUseCase" had the same function argument and returned the same value. Why not replace the code of the "invoke" function with another function such as "checkRootMethod2"?
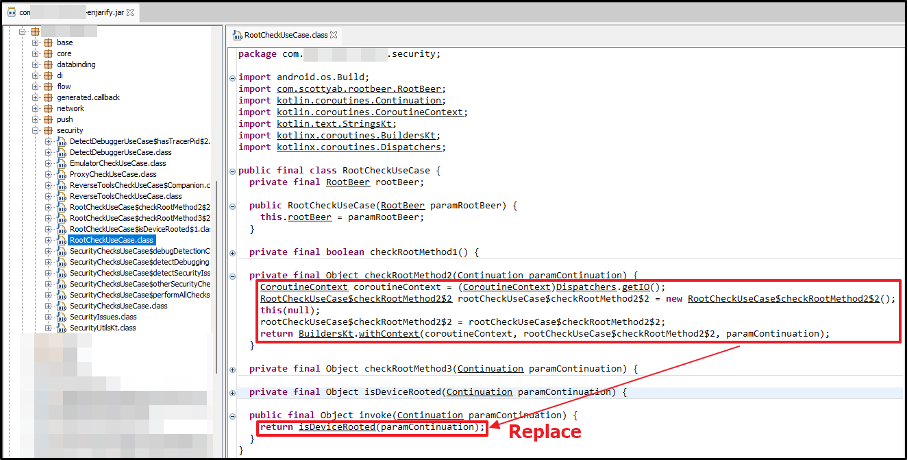
As the JD-GUI .jar file cannot be edited, we had to do this by modifying the Smali code.
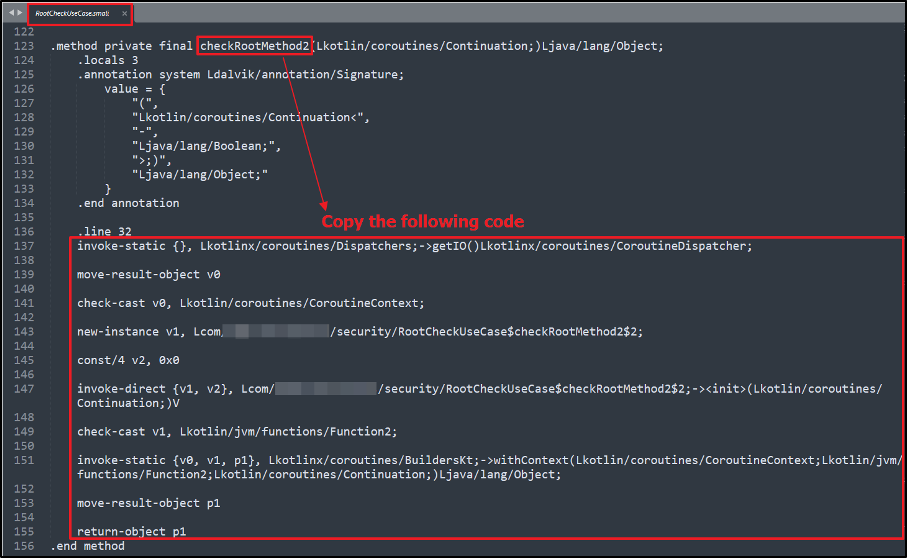
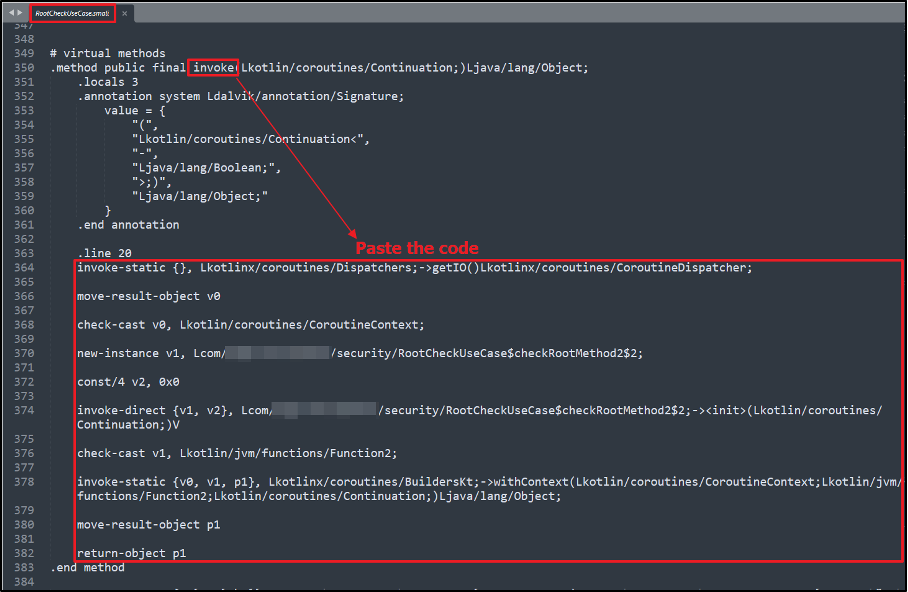
- Step 1: Copy the Smali code of "checkRootMethod2" function.
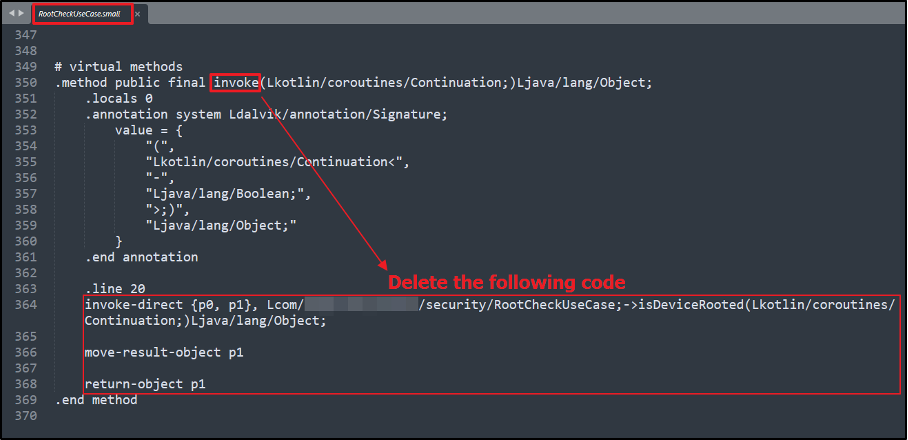
- Step 2: Delete the existing Smali code of "invoke" function.
- Step 3: Paste the Smali code of "checkRootMethod2" into "invoke" function.
Done correctly, the modified “invoke” function should execute the code written in "checkRootMethod2" function.
Step 1 : Copy the Smali code of "checkRootMethod2" function.
Step 2: Delete the existing Smali code of "invoke" function.
Step 3: Paste the Smali code of "checkRootMethod2" into "invoke" function.
Once these steps were completed, we analysed the object of the class created with the "checkRootMethod2" method. It returned a Boolean condition.
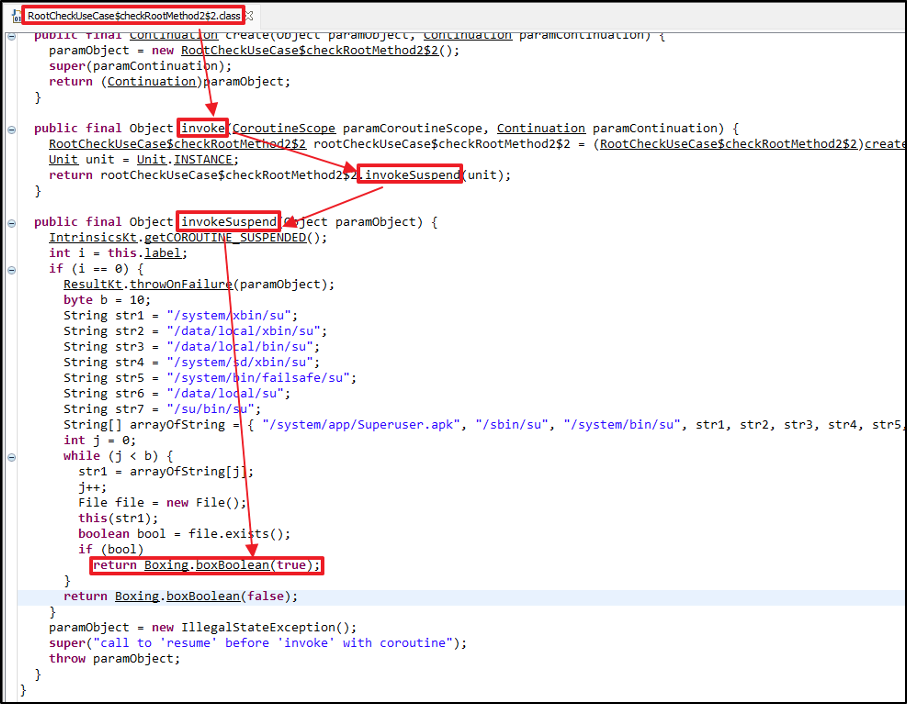
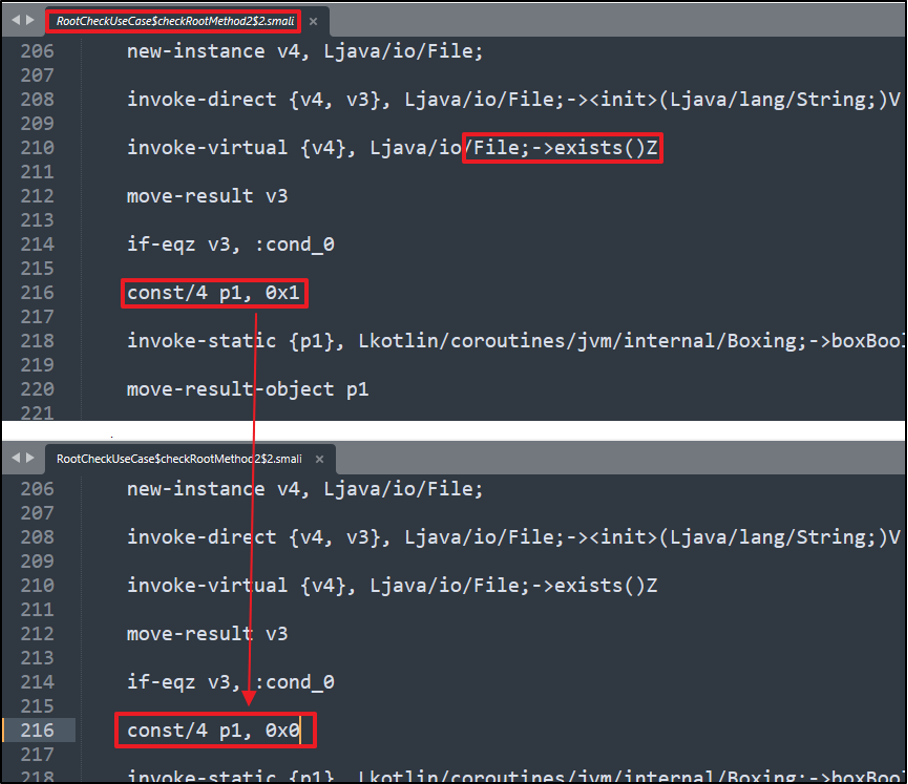
As per the code above, the function checks for existence of root files and folders. If these are detected, it returns with a True Boolean condition. In order to bypass this, we will have to force the return value to be false.
We accessed the corresponding Smali code and modified the condition to return false.
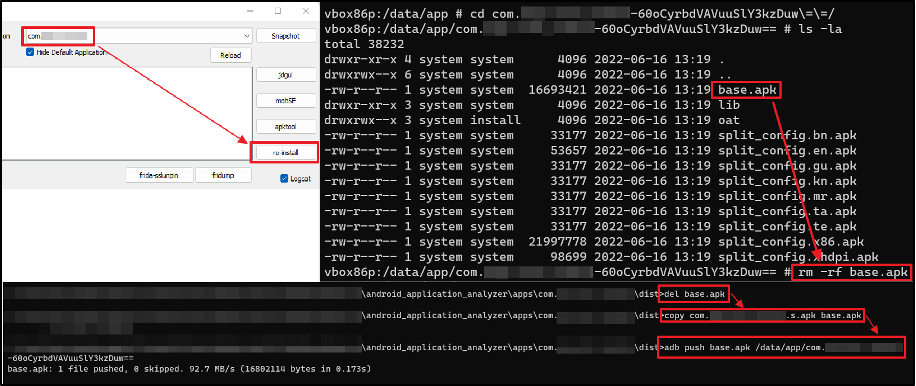
We used the default process to recompile the application and generated a modified APK file where our condition for root detection was set to false. We removed the old APK from the device and pushed the modified one as shown below:
The Next 2 Hours: Emulator Check
But even then, we faced the same issue. Sometimes a pen tester begins to wonder if their problem really can be solved. They despair. They almost give up. They lose hope of ever being able to solve their problem. Then they remember that solving such challenges is the joy of being a pen tester.
We went back to the code in JD-GUI and spent time going through different files and spotted the class responsible for all the client-side checks. We found that the application had an emulator check and a Frida check as well.
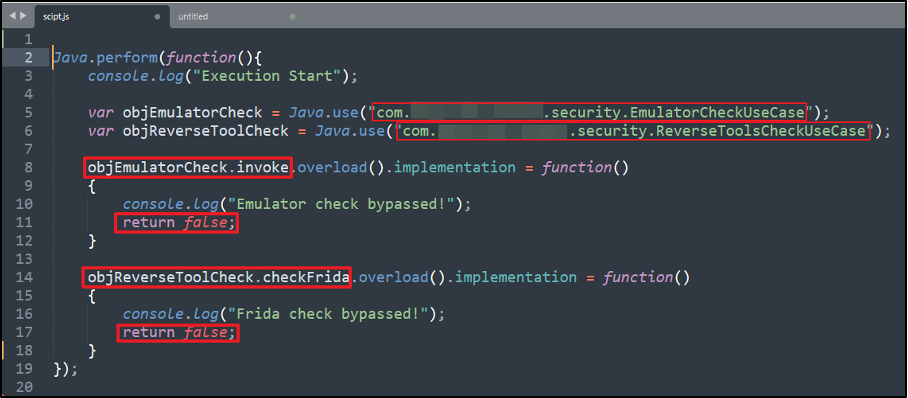
We noted the function responsible for "Emulator" detection check. This "Invoke" function did not have any parameter and returns a Boolean value. To bypass this, we created a Frida Script.
The Next 1 Hour: Frida Running Check
But there was another problem: a Frida check was preventing our script from running. So we had to do yet another bypass on the Frida check function.
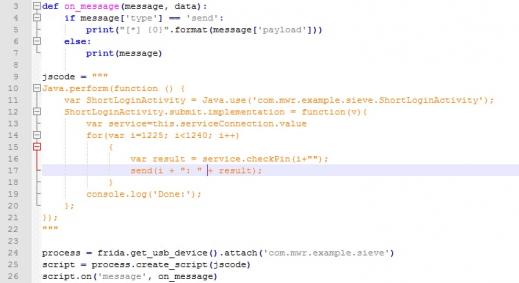
We created a Frida script to bypass the "Emulator" and "Frida Running" check.
Hoping to see some success, we hooked the Frida script and got the "Root Detection" error message, but this time clearly stating that the activity was triggering the Security Root Detection.
The Next 2 Hours: Root Detection Check in React Native "index.android.bundle" file
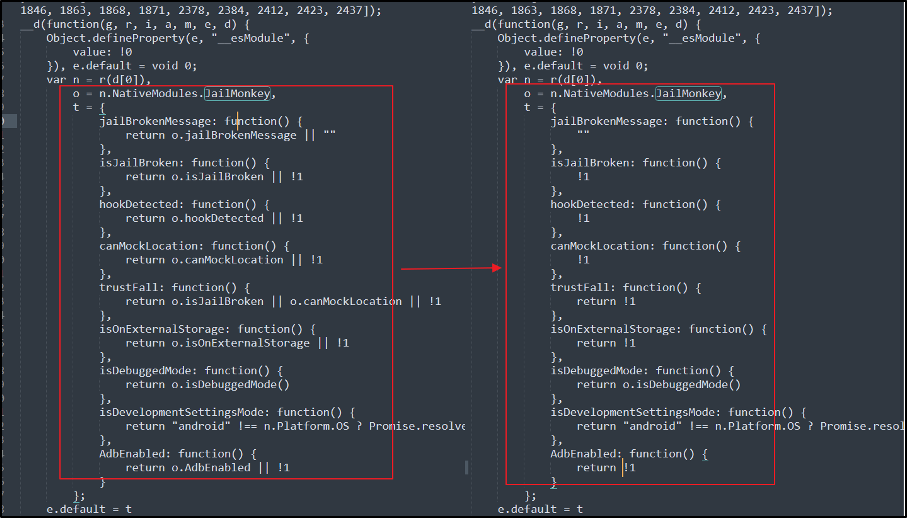
Further analysis identified that the app had implemented the root detection check in the "index.android.bundle" file. To bypass this endpoint, we made the following changes in the "index.android.bundle" (see image below). Eventually, when this "JailMonkey" function is called, all the functions will return blank error messages and return false values, allowing us to bypass this check too.
We installed the modified APK and hooked the Frida script on the application. Finally, we were able to load the application with all the following checks bypassed:
- Root Detection check in Native Android
- Emulator check in Native Android
- Frida Running check in Native Android
- Root Detection check in index.android.bundle

The Final 3 Hours: SSL Pinning Bypass
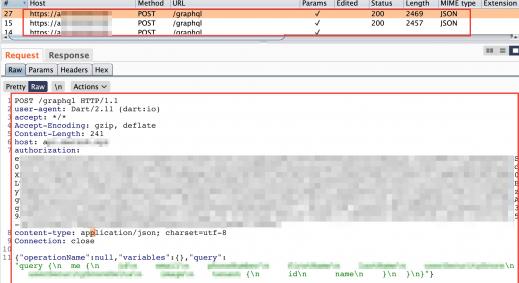
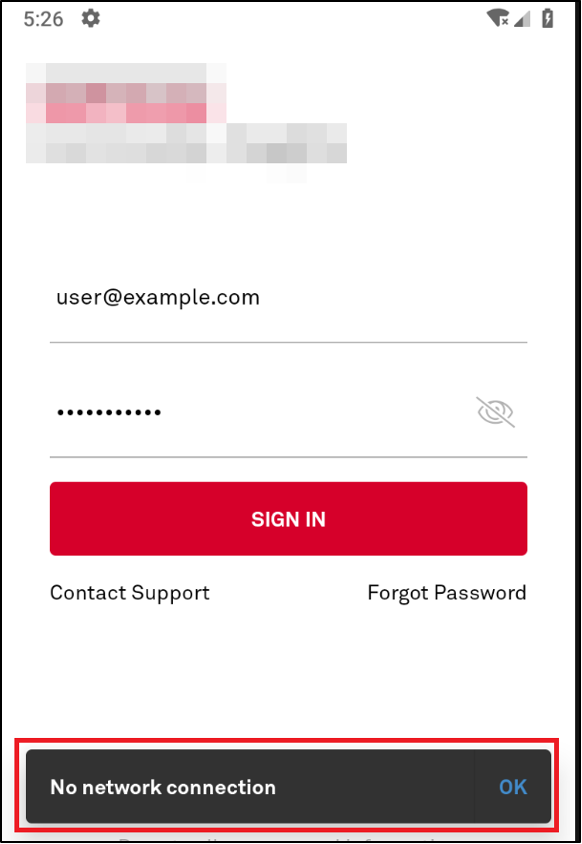
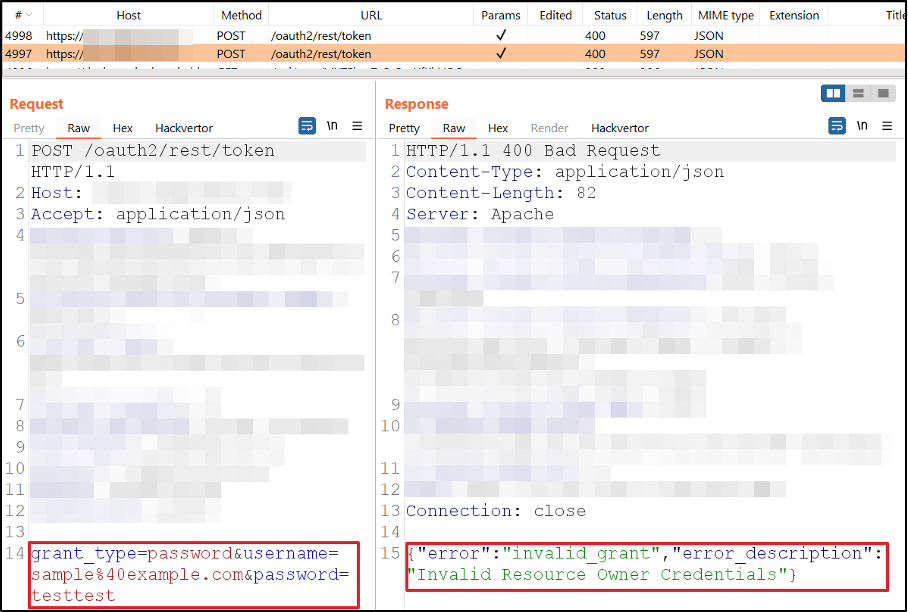
But the story doesn't end there; we had only bypassed root detection but still had to capture the traffic. As stated previously, the application has a protection against network proxy. If we put in a proxy IP to redirect traffic to the proxy tool, we get a "No Network Connection" error. This obviously indicates that SSL Pinning is in place for the application.

We used a well-renowned script written by Cubehouse that does most of the checks to bypass SSL Pinning. It works (almost) every time.
The script was able to detect some of the domains, but we were unable to do a complete SSL Pinning Bypass as we kept getting the same "No Network Connection" error message.
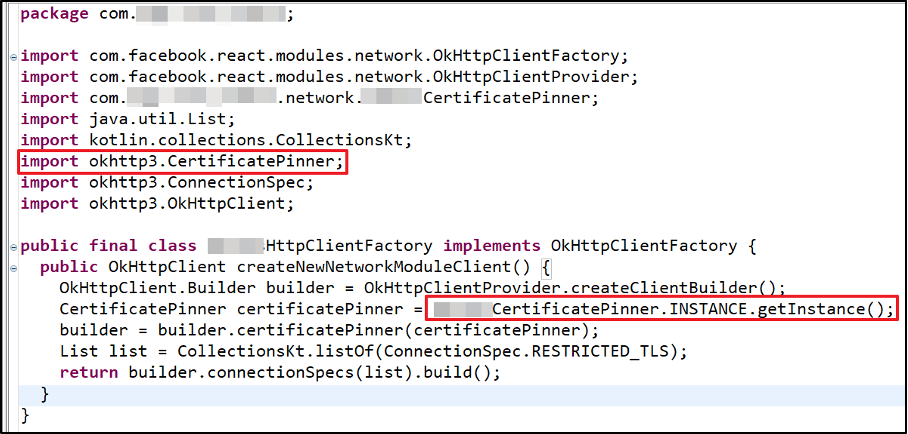
Jumping back to JD-GUI, we identified the custom implementation of SSL Pinning in the application. As we can see there is a class named "XXXXCertificatePinner". The next thing is to identify the endpoint where the object for this class is created.
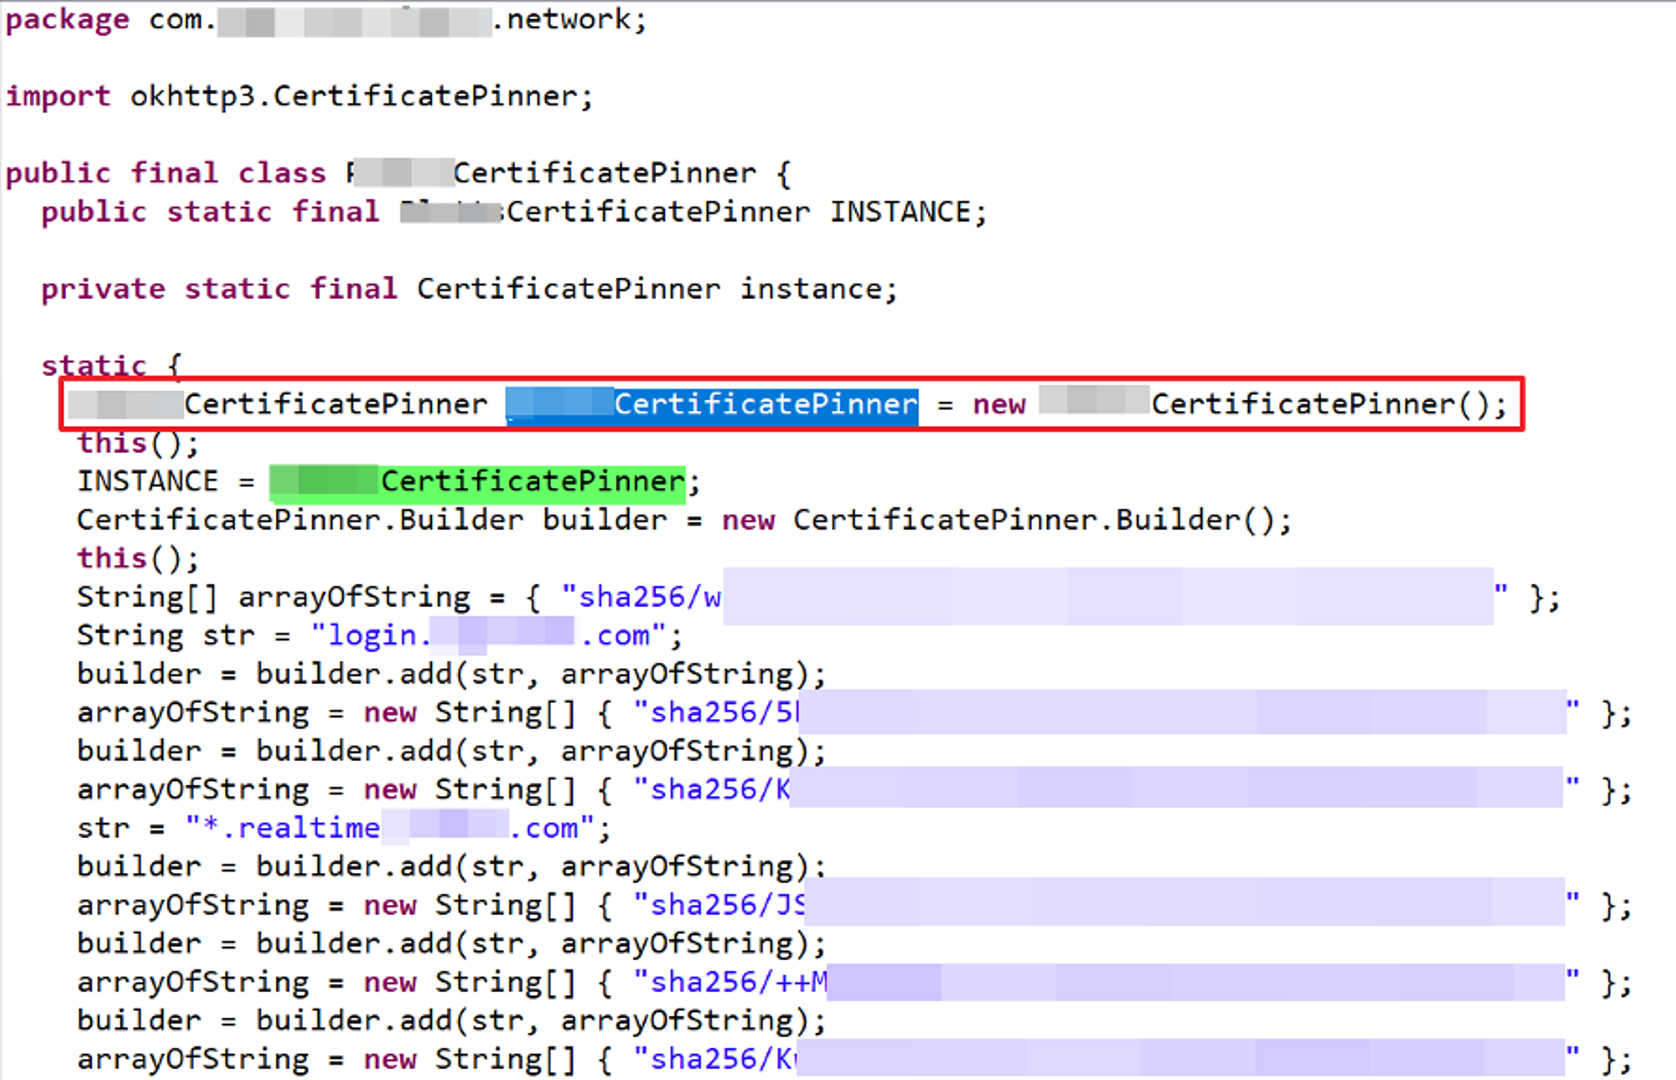
We spotted the endpoint where the object of "XXXXCertificatePinner" was created and analysed the package "okhttp3.CertificatePinner".
We identified a few methods which returned void and seemed responsible for SSL Pinning. The best way to verify our hypothesis was by deleting the entire code from all the methods highlighted below:
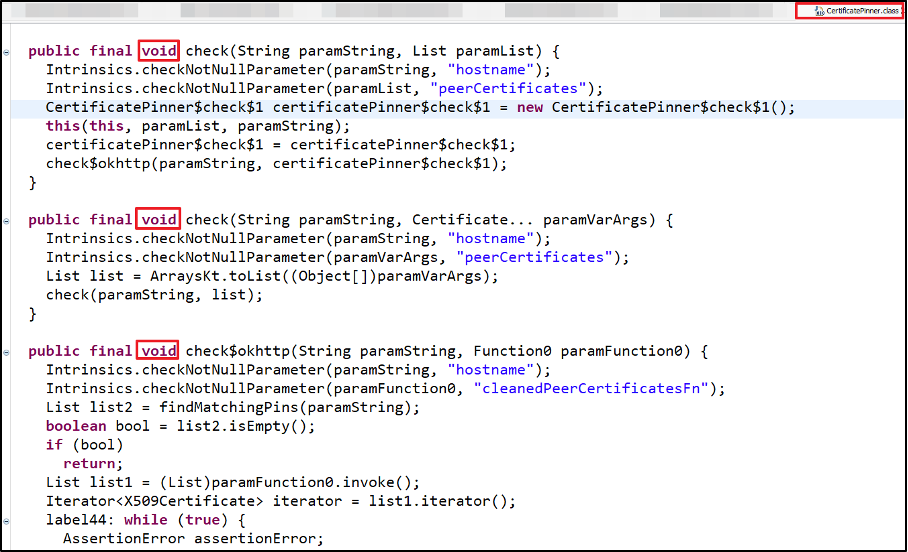
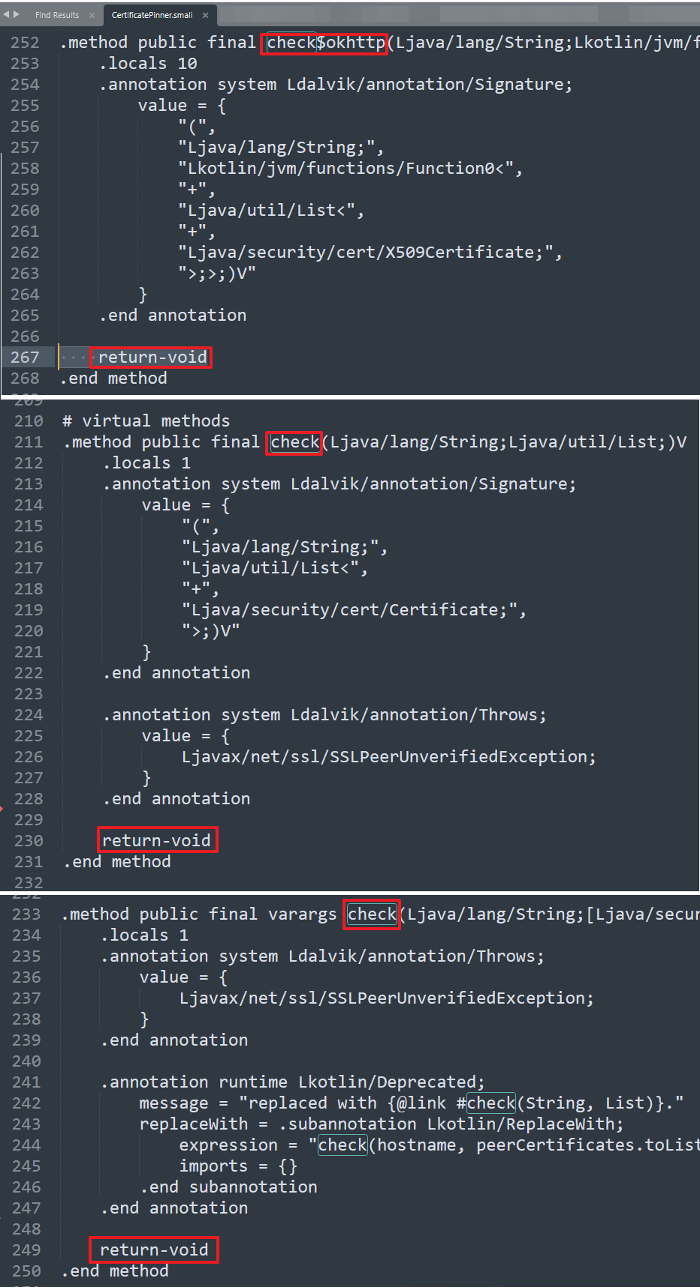
We deleted from the code all the methods in Smali to simply return a blank void.
Once again, we rebuilt the application. This time, FINALLY we were able to capture the traffic and perform the API testing further.
This was one of the most interesting pen tests we have had the pleasure of working on. As always, our persistence and thinking outside the box paid off.
Penetration testing is an essential part of your cybersecurity programme. Implementing penetration testing as part of your information security strategy will allow you to assess the security your organisation’s principal assets and identify areas for improvement.
For more information on how penetration testing could benefit your security posture, get in touch below.