Attacking cryptographic weaknesses is a dream hack for most penetration testers. Attacks on weak hashes and ciphers (MD5, ROT13 anyone?) are not uncommon, but breaking tougher cryptography encryption algorithms like ECDSA? That’s something else.
In this blog post, Sanjay from the NotSoSecure team explains how pentesters can benefit from a good understanding of cryptography and potential weaknesses in its implementation. In particular, he talks about how to exploit ECDSA to perform a nonce reuse attack.
In this blog post, we will cover:
- Examples of ECDSA-based attacks
- Identifying ECDSA (nonce reuse)
- Exploiting ECDSA with a NotSoSecure sample script
- Understanding elliptic curve cryptography to customize the exploit
- How are points on an elliptic curve generated?
- How is the addition of two points (x1, y1) and (x2, y2) performed on an elliptic curve?
- How is the signature generated in elliptic curve cryptography?
- How the signature is verified in elliptic curve cryptography?
- ECDSA signing and verification using real-world values
- Putting it all together: performing the ECDSA nonce reuse attack
From a pentester’s perspective, the most common use of Elliptic Curve Digital Signature Algorithm (ECDSA) is in the signature fields of JSON Web Tokens (JWTs). (New to JWTs? Check out this introduction.) Since these are often used as bearer tokens for authorization, if you are able to forge the signatures in a JWT, then you can most likely impersonate a user of the application – possibly any known user of the application – using this technique.
There are other use cases of ECDSA exploitation too, making this a very useful technique. Although the math involved is quite complex, the attack itself is fairly straightforward to learn and practice.
Examples of ECDSA-based attacks:
- Sony PS3 Hack: At the 2010 Chaos Communication Congress, a group demonstrated their use of ECDSA-based attacks to hack a PS3 console and observe Sony’s code.
- Bitcoin Hack Analysis: Researchers at Kudelski Security discovered a novel way to exploit complex relations between nonces to retrieve the signing key. They applied this to datasets such as the Bitcoin and Ethereum networks. The Bitcoin blockchain is a large, public mine of ECDSA signatures and when researchers discovered a large number of compromised Bitcoin wallets, they suspected that the vulnerability had already been exploited to drain them.
- Psychic Signatures in Java : Neil Madden’s blog found that attackers could easily forge SSL certificates and handshakes, effectively bypassing security mechanisms on any servers running Java 15, 16, 17 or Java 18 before the April 2022 patch update.
- CTF in JWT: There is even a CTF aimed at using ECDSA exploitation techniques to forge JWTs and gain admin access on a website.
Identifying ECDSA (nonce reuse)
First we have to identify the vulnerability, then generate the malicious data/payload to exploit that vulnerability. To demonstrate this technique, we use a simple signed read-request for an application.
Start by checking whether there is a significant repetition in multiple instances of an ECDSA signature e.g., in the first part of the signature below:
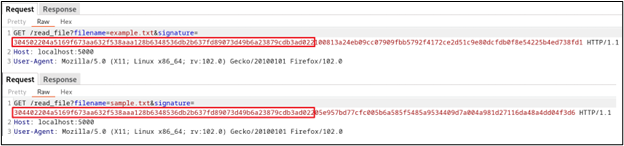
This is an indication that a common ECDSA, called nonce reuse, can be exploited. In this case, the file can only be read if an ECDSA signature by an authorized signer for the filename is included in the request. But, what if we are able to generate the signature for any arbitrary payload?
Exploiting ECDSA (nonce reuse) with a NotSoSecure sample script
To exploit ECDSA (nonce reuse) without needing to understand any of the underlying cryptography, you can use our sample script to generate the signature for any plaintext value in the NotSoSecure playground application.
In this example, such signatures can be used to read any arbitrary file on our application. If you would like to read the source code to understand it better, there is an open-source playground application available on our GitHub repo.
Understanding elliptic curve cryptography to customize the exploit
Customizing the payload will help you tweak the exploit to your specific requirements. However, this requires a deeper understanding of the signing and verification process.
If you want to get to grips with the fundamentals of ECDSA cryptography, check out this blog by NotSoSecure’s very own Sanjay Gondaliya. A basic understanding of ECDSA cryptography and its uses is required to follow the attack technique we will demonstrate.
How are points on an elliptic curve generated?
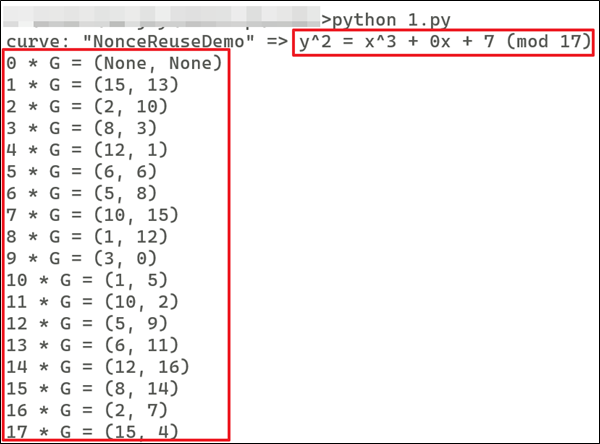
For all the examples and code below, let's use the popular SECP256k1 curve (used in Bitcoin). First a base point G is generated. Then based on this point, subsequent points are calculated in the following manner:
- G = (15, 13)
- 2 *G = 2G = G + G = (15, 13) + (15, 13) = (2, 10)
- 3 * G = 3G = 2G + G = (2, 10) + (15, 13) = (8, 3)
- Similarly, values of 4G, 5G, 6G …... 17G are calculated using the same method.
To understand this, we need to understand how the addition of two co-ordinates happens on an elliptic curve.
How is the addition of two points (x1, y1) and (x2, y2) performed on an elliptic curve?
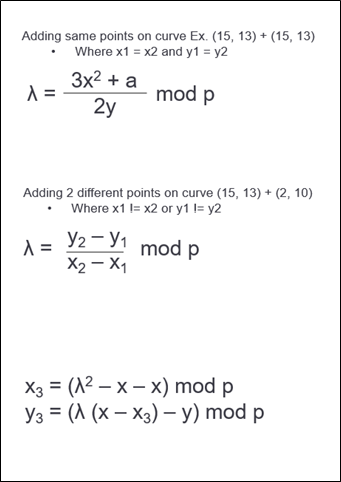
For the addition of two co-ordinates on graph there are 2 possible conditions:
- Adding two points where x1=x2 and y1 = y2
- Adding two points where x1 != x2 or y1 != y2
For both the conditions, λ is calculated differently, and then the coordinates x3 and y3 are calculated as shown below:
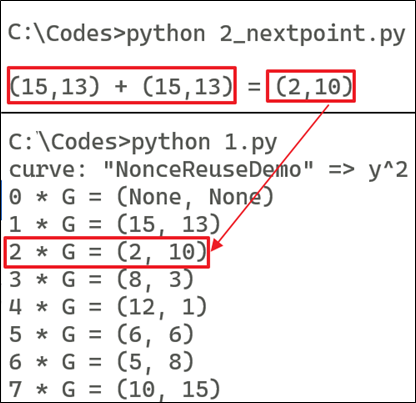
Let's explain this programmatically: to get 2G, we can add G + G = 2G, and verify it using the following code (2.py):
- Where G = (15, 13)
- 2 * G = 2G = G + G = (15, 13) + (15, 13)
#2.py
import libnum
x1, y1= 15, 13
x2, y2= 15, 13
a, b = 0, 7
p=17
if (x1 == x2 and y1 == y2):
delta = (((3*pow(x1,2)) + a) * (libnum.invmod(2*y1, p))) % p
else:
delta = ((y2-y1)*libnum.invmod(x2-x1, p)) % p
x3 = (pow(delta,2) - x1 - x2) % p
y3 = ((delta * (x1 - x3)) - y1) % p
print ("\n({}, {}) + ({}, {}) = ({}, {})".format(str(x1), str(y1), str(x2), str(y2), str(x3), str(y3)))
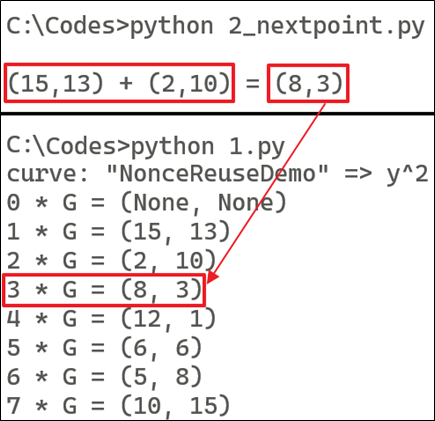
Similarly, to get 3 *G = 3G = 2G + G = (15, 13) + (2, 10)
#2.py
import libnum
x1, y1= 15, 13
x2, y2= 2, 10
a, b = 0, 7
p=17
if (x1 == x2 and y1 == y2):
delta = (((3*pow(x1,2)) + a) * (libnum.invmod(2*y1, p))) % p
else:
delta = ((y2-y1)*libnum.invmod(x2-x1, p)) % p
x3 = (pow(delta,2) - x1 - x2) % p
y3 = ((delta * (x1 - x3)) - y1) % p
print ("\n({}, {}) + ({}, {}) = ({}, {})".format(str(x1), str(y1), str(x2), str(y2), str(x3), str(y3)))
By following the process, we can get the value of 4G = 3G + G, 5G = 4G + G, etc,. until we reach, 17G = 16G + G.
So, now we have co-ordinates we need for the curve equation below:
Now, we understand the concept of G, 2G, 3G, and how they are calculated. This is required to generate the public key coordinate during the verification process and identify the "r" coordinate during the signature generation process.
How is the signature generated in elliptic curve cryptography?
Once you understand how the graph points are added, the signing and verification process is simply the same operation plotted on a graph; we need to identify the specific point on the graph during the signing process and recalculate that point during the verification process. (For more detail on the signing process, check out this blog.)
To perform the signing, we need to select the private key integer and k (nonce) integer. To understand the process more easily, let's use smaller numbers e.g., the private key = 10 and k = 7.
(Disclaimer: this example is only to demonstrate the principle; in real life, the private key is usually a very large integer e.g., in the range of 2 127.)
from tinyec.ec import SubGroup, Curve
import hashlib
import libnum
hashval = 123111 #Assumed that this is a hash of some custom text message
field = SubGroup(17, g=(15, 13), n=18, h=1)
curve = Curve(a=0, b=7, field=field, name='NonceReuseDemo')
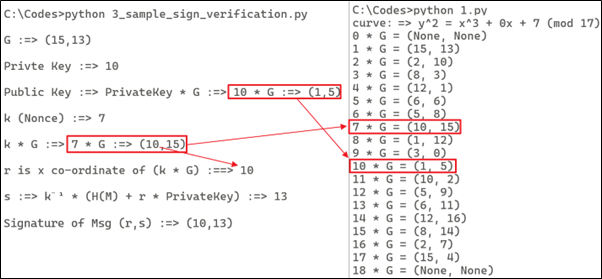
print ("\nG :=> ({},{})".format(str(15), str(13)))
privateKey = 10
print ("\nPrivte Key :=> " + str(privateKey))
publicKey = privateKey * curve.g
print ("\nPublic Key :=> PrivateKey * G :=> 10 * G :=> ({},{})".format(str(publicKey.x), str(publicKey.y)))
k = 7
print ("\nk (Nonce) :=> " + str(k))
R = (k*curve.g) #Temp Variable
print ("\nk * G :=> 7 * G :=> ({},{})".format(str(R.x), str(R.y)))
r = R.x
print ("\nr is x co-ordinate of (k * G) :==> " + str(r))
s = (libnum.invmod(k, curve.field.n) * (hashval + r * privateKey)) % curve.field.n
print ("\ns :=> k\u207b\u00b9 * (H(M) + r * PrivateKey) :=> " + str(s))
print ("\nSignature of Msg :==> ({},{})".format(str(r), str(s)))
How is the signature verified in elliptic curve cryptography?
Now that the signature has been generated, it must be signed. (For a more detailed explanation of the signature verification process, check out this blog post.)
Let's demonstrate the verification using the sample code below.
from tinyec.ec import SubGroup, Curve
import hashlib
import libnum
field = SubGroup(17, g=(15, 13), n=18, h=1)
curve = Curve(a=0, b=7, field=field, name='NonceReuseDemo')
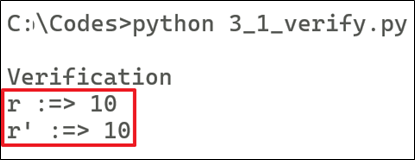
print ("\nVerification")
hashval = 123111
r = 10
print ("r :=> " + str(r))
s = 13
privateKey = 10
publicKey = privateKey * curve.g
s1 = libnum.invmod(s, curve.field.n)
R = ((hashval * s1) * curve.g) + ((r * s1) * publicKey)
print ("r' :=> " + str(R.x))
ECDSA signing and verification using real-world values
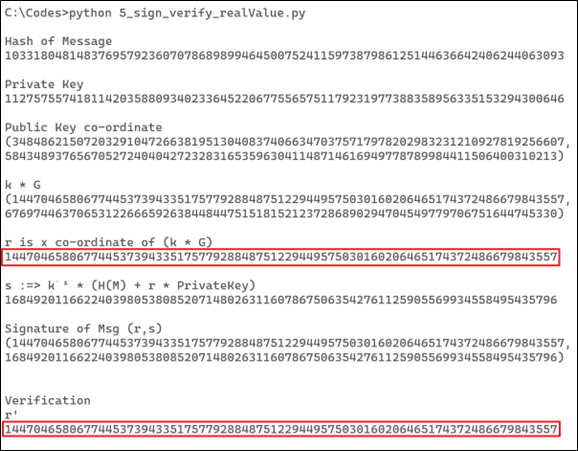
Now let's perform the signing and verification processes using real-world curve data. The process is the same as above, only using a larger integer.
from tinyec.ec import SubGroup, Curve
import hashlib
import libnum
hashval = 103318048148376957923607078689899464500752411597387986125144636642406244063093
#hashval = 123423418048148376989543525467878689899464500752234234234243234144636642406244
print ("\nHash of Message")
print (hashval)
field = SubGroup(2 ** 256 - 2 ** 32 - 2 ** 9 - 2 ** 8 - 2 ** 7 - 2 ** 6 - 2 ** 4 - 1, g=(108607064596551879580190606910245687803607295064141551927605737287325610911759, 6661302038839728943522144359728938428925407345457796456954441906546235843221), n=115792089237316195423570985008687907852837564279074904382605163141518161494337, h=1)
curve = Curve(a=0, b=7, field=field, name='NonceReuseDemo')
privateKey = 112757557418114203588093402336452206775565751179231977388358956335153294300646
publicKey = privateKey * curve.g
print ("\nPrivate Key")
print (privateKey)
print ("\nPublic Key co-ordinate")
print ("({},{})".format(str(publicKey.x), str(publicKey.y)))
k = 10
R = (k*curve.g) #Temp Variable
print ("\nk * G")
print ("({},{})".format(str(R.x), str(R.y)))
r = R.x
print ("\nr is x co-ordinate of (k * G)")
print (str(r))
s = (libnum.invmod(k, curve.field.n) * (hashval + r * privateKey)) % curve.field.n
print ("\ns :=> k\u207b\u00b9 * (H(M) + r * PrivateKey)")
print (str(s))
print ("\nSignature of Msg (r,s)")
print ("({},{})".format(str(r), str(s)))
print ("\n\nVerification")
s1 = libnum.invmod(s, curve.field.n)
R = ((hashval * s1) * curve.g) + ((r * s1) * publicKey)
print ("r'")
print (R.x)
Putting it all together: performing the ECDSA nonce reuse attack
If an application uses the static value of k (nonce), then we can recover the k (nonce) from two different signatures that are generated for two different messages. In the above example, we have selected k =10 for all the signatures that are generated. As mentioned earlier, as a receiver, we have the following information, seen in the image below:

If you observe the value of r1 and r2 in the above image, then both are same because:
- r1 = k * G
- r2 = k * G
- Where k = 10 which is a static value, it will produce the same value for r1 and r2.
- To simplify this, instead of using r1 and r2, let’s denote this as r only.
Now we have two signatures:
- Signature1 = (r, s1)
- s1 = k-1 * (H(M1) + r * PrivateKey)
- Signature2 = (r, s2)
- s2 = k-1 * (H(M2) + r * PrivateKey)
To obtain k (nonce) value from s1 and s2, let’s perform subtraction between s1 and s2:
- (s1-s2) = (k-1 * (H(M1) + r * PrivateKey)) – (k-1 * (H(M2) + r * PrivateKey))
- (s1-s2) = k-1 * ((H(M1) + r * PrivateKey) – (H(M2) + r * PrivateKey))
- k * (s1-s2) = ((H(M1) + r * PrivateKey) – (H(M2) + r * PrivateKey))
- k * (s1-s2) = H(M1) + (r * PrivateKey) – H(M2) – (r * PrivateKey)
- k * (s1-s2) = H(M1) – H(M2)
- k = (s1-s2) -1 * (H(M1) – H(M2))
Now, once we identify k, we can also extract the private key as well. To do so, we can choose either equation s1 or s2. For example, I am choosing the value of s1 as follows:
- s1 = k-1 * (H(M1) + r * privateKey)
- s1 * k = H(M1) + r * privateKey, we can also write this as:
- H(M1) + r * privateKey = s1 * k
- r * privateKey = (s1 * k) – H(M1)
- privateKey = r-1 * ((s1 * k) – H(M1))
from tinyec.ec import SubGroup, Curve
import hashlib
import libnum
field = SubGroup(2 ** 256 - 2 ** 32 - 2 ** 9 - 2 ** 8 - 2 ** 7 - 2 ** 6 - 2 ** 4 - 1, g=(108607064596551879580190606910245687803607295064141551927605737287325610911759, 6661302038839728943522144359728938428925407345457796456954441906546235843221), n=115792089237316195423570985008687907852837564279074904382605163141518161494337, h=1)
curve = Curve(a=0, b=7, field=field, name='NonceReuseDemo')
h1 = 103318048148376957923607078689899464500752411597387986125144636642406244063093
r1 = 14470465806774453739433517577928848751229449575030160206465174372486679843557
s1 = 16849201166224039805380852071480263116078675063542761125905569934558495435796
h2 = 123423418048148376989543525467878689899464500752234234234243234144636642406244
r2 = 14470465806774453739433517577928848751229449575030160206465174372486679843557
s2 = 99914200622322518508474186255359721152936178974379819004639043883844248316147
temp = libnum.invmod((s1-s2), curve.field.n)
recovered_K=((h1-h2) * temp) % curve.field.n
print ("\nRecovered K :=> " + str(recovered_K))
recovered_priv = (libnum.invmod(r1, curve.field.n) * ((s1 * recovered_K) - h1)) % curve.field.n
print ("\nRecovered PrivateKey :=> " + str(recovered_priv))

Once we obtain the k (nonce) and private key, we can generate the signature for the user message and exploit the application functionality. For that reason, we need to use k (nonce) as a random number for any message that we sign using ECDSA.
References: